I have been absent too long once again. The school year has gotten off to a good start and though I am exhausted already, I have not been idle. Yes, my post are not happening and I do, once again, apologize. My plan - pledge to you but also to myself is to get As The Art Flies back up and running again. My goal is to retool and build my art practice. With that said, what can you expect in the coming weeks? Well, I have set a challenge for myself to create something everyday. I have not been totally 100% successful but I have been working. Sorry no pics yet but I will get them up. I am also working out in my brain a reflective process to figure out where I need to point my creative compass. At this time the fog is clearing and I am sailing with favorable winds towards a more craft - mixed media approach that utilizes my skill set of drawing, assembling, constructing and sewing. Simply put I am not a painter - I tried as I come from a long line of painters but where my heart truly lies is using my hands to craft. So, to my readers who have come back and tried to find something new, I hope to be more active and engaged in my blogging on As the Art Flies.
Cheers,
Angela
Sunday, October 7, 2012
Monday, July 9, 2012
Housekeeping: Bookcases redone
In an effort to make my home the creative and comfortable place I have dreamed it to be, I have begun the process of weeding out clutter and reorganizing my storage units around the home. I also have been thinking of ways to redecorate the place in a style that was easy to keep up and provide the beautiful surroundings I desired. Among many, I have two old bookcases that I originally stained white and were now pretty tired looking. Now, let's back up a bit as there is a history - albeit brief - on why I am even fixing a beady eye on the bookcases at all. Here's what happened:
My condo sustained water damage from an up-stairs water heater. Two weeks later living room corner walls had been torn out, dried out and reconstructed. In preparing for that I had to pack up books, china and sewing/art supplies. As I was planning to put it all back, I decided to use the paint the constructions guys left behind to refurbish the two small bookcases that I planned to keep. In general, I find that painting furniture is a tedious business! I prayed that it could be done in two coats. The bookcases are totally made of wood - no composite anywhere - and I was able to do the painting in two coats of interior semi-gloss paint. However, the backing is just plan rough plywood which would take a lot more effort to get a smooth paint job done. How could I do finish this project without going to any expense or more time? Light bulb went off! I had an 18th century print shelving paper that I had not completely used. So, I pried off the backs, measured out the shelving paper, peeled off the backing on the paper and smoothed it down with a brayer. I folded the edges over towards the back which would not be seen. Then reattached the bookcase back to the cases. They came out pretty good! Here is one of them:
As I am going for a Gustavian-French urban country look (yeah, that is a mouth full), having white bookcases is part of the picture. I was very proud of my make-do and mend effort. Besides I was in luck that the workers left the 3/4 gallon can of paint behind, so there was no cost to me at all. Everything that was used was on hand. Expenditures: $0.00 :)
My condo sustained water damage from an up-stairs water heater. Two weeks later living room corner walls had been torn out, dried out and reconstructed. In preparing for that I had to pack up books, china and sewing/art supplies. As I was planning to put it all back, I decided to use the paint the constructions guys left behind to refurbish the two small bookcases that I planned to keep. In general, I find that painting furniture is a tedious business! I prayed that it could be done in two coats. The bookcases are totally made of wood - no composite anywhere - and I was able to do the painting in two coats of interior semi-gloss paint. However, the backing is just plan rough plywood which would take a lot more effort to get a smooth paint job done. How could I do finish this project without going to any expense or more time? Light bulb went off! I had an 18th century print shelving paper that I had not completely used. So, I pried off the backs, measured out the shelving paper, peeled off the backing on the paper and smoothed it down with a brayer. I folded the edges over towards the back which would not be seen. Then reattached the bookcase back to the cases. They came out pretty good! Here is one of them:
 |
| This is the shelving paper pattern I used. It is a pale grey on an off-white background. Very subtle. |
 |
| The book cases redone. |
Saturday, June 30, 2012
Arts and Crafts: Kick starting my practice
 |
| Summer grasses 6/2012 |
In the last few months I have been seriously considering, AM I an ARTIST? Am I really? What does it mean to me to be an artist? What does it take to have a passion about it so strong that you do it over everything else? Although I still can't answer all the questions fully, I decided to own this: I am a creative person who is an artist, a crafter, and an enthusiast for creative living. So, I have switched my focus of this blog to share my ongoing project of creating a beautiful life. A life that is surrounded by beautiful and useful things (thank you William Morris). A life that is evolving my artistic talents not only to go public at art shows but also to embrace my God given talents - to own them whether someone sees them or not.
With all this said, above is a quick practice piece using acrylics in a mixed media sketch book. I found it at Blicks in Berkeley. I chose a large format 11" x 14" as I usually have sketch books of 9 x 12 or less. I wanted to just play with brush strokes and building depth. I am a trained technical illustrator in the genre of botanical and biological images, so painting doesn't come easy for me as I want to be detailed like when I use pen and ink or colored pencils. The acrylics I find makes me look at things with a broader eye - breaking things into blocks of color and lights and darks.
As an educator I get my summers off (I call it battle pay with out the paycheck). However, my time is my own and I can refocus myself on what matters to me. The trick of course is to make creativity a habit like eating, sleeping and brushing your teeth!
Goals:
A sketch a day. Do something for 10 mins or more a day. (Note: I have allowed myself to include any sketching I do for historical costuming - see my other blog: http://www.lachatelainechocolat.blogspot.com/.)
Try a new way of looking and interpreting an image. This will help me try different mediums other than pencil, pen and ink.
To post regularly my efforts at least once a week.
I hope you will continue to join me and see how my progress moves along. Thank you for your patience and hanging in there with me. Cheers!
Sunday, May 13, 2012
One
 |
| Letters and Numbers |
The Creative Everyday http://creativeeveryday.com theme for May 2012 is ONE. I have been creatively blocked for a while. Yes, I can blame the energy sucking job, my distractions like watching Downton Abbey for the umpteenth time or just everyday stuff that I allow to get in my creative way. Yet, the blame won't get me anywhere and I am pledging to let go and just accept that I am where I am suppose to be and I am finally getting my artistic butt in gear.
The above is one of 18 pieces I have done since last July. I had flurries of moments where I created grid after grid. Once school started - I am a teacher by trade - the energy slowed to a grid here and a grid there. Christmas came along and all my creative energy went into holiday crafting. Yet, this most recent one was in an effort to redirect myself back to my ultimate goal: Create an life that is infused with art.
These grids are a great exercise for me. They allow me to not think and play with colors, textures and patterns. It is an experiment in composition as well. Like my mood boards that I change by the season, I like these grids. They are orderly, quiet and soothing for me when I have had a trying day, moment or week.
I started these exercises last summer (2011). The images are from magazine pages, bits and pieces I have culled from my favorite magazines. I work in a 6 " by 12 " spiral sketchbook with paper that is a heavyweight natural, white and is able to take the Mod Podge I use to glue the squares down without buckling. For the squares I use a Marvy Uchida 1" punch. The images come from magazines that use a heavier weight of paper because I find that the Marvy Uchida will eat the paper if it is the cheap or super thin brand of magazine paper.
To start, I draw a 4 x 7 grid rectangle lightly in pencil, then arrange the squares in a pleasing way. Sometimes I let it sit for a day or two and move things around - I also pray the cat doesn't do a jump on to the table and scatter the pieces. Sigh. Once I like the arrangement I carefully move the squares to the table in the right order. I use a sponge brush and lay on a nice juicy layer of Mod Podge and then adhere the squares one by one in a single row using my fingers to quickly push out any air bubbles. I then use a brayer - a hard rubber one use for linoleum prints to make sure the squares are flat and glued. I repeat the process with the next four rows. I put one thin layer of Mod Podge over the whole thing.
If you are one of those people who collect magazine pages and really need to weed out and also want a quiet easy exercise just to get your mind off your troubles, free up that creative bird to soar a bit try this.
Friday, March 30, 2012
Catching up! Early Spring Mood Board
I have been busy - work is not letting up and I have a few more weeks of craziness there. The energy sucking continues. Sigh. However, the creative itch continues - so I try to satisfy or rather sooth the itch with some creative exercises that just take the edge off the irritation that I can't put my full focus on my art. In the Winter I took a bulletin board that hangs on a wall at one end of my galley kitchen and created a Winter mood board. Actually I did it for Autumn as well. Let's see did I post about these? Oh, here is the autumnal post: http://astheartflies.blogspot.com/2011/11/art-every-day-challengechallenging.html. The Winter one is...let's see, its, right...well I tried to do a link but for some reason google is messing with me and won't let me call up that post. Sigh.
Well, March 21st has come and gone. Primavera is here. In California we are experiencing a very wet and cold spring with moments of beautiful sunny, tepid weather. Daffodils are up and brightening up the landscapes and gardens. Flowering quince and cherry are just dropping petals like snow on the green grasses. Its beautiful! Inspired, my mood board is now reflecting the shift from a stark winter to a soft and pastel spring.


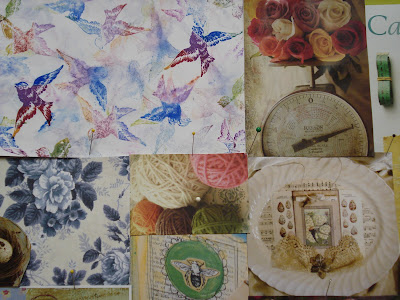
 Many of the images I use are from many magazines especially my favorites - Somerset Life, Marie Claire Idees, and Country Living British Edition. Others come from scrapes and pieces of purchased patterned papers. This is a board to inspire me and not something I would sell or use for sale. So, I don't think I have infringed on other artists territory by posting my mood board. If I have please let me know and many apologies.
Anyway, it is fun going through my stash of papers and images and deciding which one's work well together in terms of color, texture and patterns. In a way, its a great way to practice my composition skills for future reference. I highly recommend making mood boards to get past a creative block and to rejuvenate the creative juices. Give it a try. You don't need a big space. I took an old cork board 24 x 32 that covered in an oatmeal colored linen. I use sewing pins and tack all the images down. I can move things around easily since nothing is permanent. So easy to put up and to remove for the next season or if the mood strikes me to do something else.
This exercise as gotten me thinking about Leah Piken Kolidas' ( Creative Every Day) http://creativeeveryday.com April's theme around 'Language'. As I have a crazier three weeks to come at work, I am going to challenge myself to use the theme and work on something that I can share but mainly to get me moving beyond the cross roads where action and stagnation meet. So, I will keep posted on how I get along as best I can! Cheers.
Well, March 21st has come and gone. Primavera is here. In California we are experiencing a very wet and cold spring with moments of beautiful sunny, tepid weather. Daffodils are up and brightening up the landscapes and gardens. Flowering quince and cherry are just dropping petals like snow on the green grasses. Its beautiful! Inspired, my mood board is now reflecting the shift from a stark winter to a soft and pastel spring.


Anyway, it is fun going through my stash of papers and images and deciding which one's work well together in terms of color, texture and patterns. In a way, its a great way to practice my composition skills for future reference. I highly recommend making mood boards to get past a creative block and to rejuvenate the creative juices. Give it a try. You don't need a big space. I took an old cork board 24 x 32 that covered in an oatmeal colored linen. I use sewing pins and tack all the images down. I can move things around easily since nothing is permanent. So easy to put up and to remove for the next season or if the mood strikes me to do something else.
This exercise as gotten me thinking about Leah Piken Kolidas' ( Creative Every Day) http://creativeeveryday.com April's theme around 'Language'. As I have a crazier three weeks to come at work, I am going to challenge myself to use the theme and work on something that I can share but mainly to get me moving beyond the cross roads where action and stagnation meet. So, I will keep posted on how I get along as best I can! Cheers.
Tuesday, January 10, 2012
D.I.Y. Project Week - inspired by Mollie Makes Magazine
I am a teacher at a San Francisco high school. Between the 2 semesters we have an interim course period of about a week where teachers can teach a class to 18 students. The courses range from Iron Chef, Dorm room cooking, Physics of Sledding and Yoga. This was my first year doing the program. Inspired by Mollie Makes Magaine http://molliemakes.themakingspot.com I created a D.I.Y Project Runway class to teach students how to sew (basic sewing machine use) and make accessories. We started with a coffee cup cuff, moved on to a wallet - inspired by one one of the articles in Molli Makes. Then I let them loose to be creative and use a variety of magazines and books I have from Tida Finnager's books to, yes, Mollie Makes magazines, and Altered Couture. I am so proud of my students. 90% of them have never sewn before in their lives! I had 15 girls and 3 boys.
Note: Because I didn't get permission from their parents to use their images, I am only going to show their products. Cheers!
There were more things that they made Infinity scraves, messenger bags, belts and all but I wasn't able to get pictures of those. I had 5 days to teach them to sew and though not everything was done with a 'professional' eye the students learn something and had fun with it. In the U.S. or at least in California, many schools do not teach home economics anymore. One funding is not there for it. Secondly, no one is coming out of college to teach home economics anymore and you have to have credentials to teach it in the public schools. So, I thought this would be a great way to get young people into something different - thrift it and make it.
This project was done on mostly donations. I got a lot of the fabric and notions as donations from parents and the community. Teachers and parents and students lent their sewing machines. Of all the sewing machines we had one worked the best an old 1960's Singer. Amazing, right? All the others kept breaking down and were too sensitive for use.
Now with that said, I plan to do this next year but get another teacher to help me and we may break it up to more crafting and will include sewing, knitting, embroidery, jewelry making it but the premise will be thrift it then make it.
Cheers.
Note: Because I didn't get permission from their parents to use their images, I am only going to show their products. Cheers!
 |
| Wallets |
 |
| Coffee cup cuff. |
 |
| This student took a tank top and used it as a pattern and created this bag. |
 |
| Clutch with applique. |
 |
| Drawstring bag all done by hand. |
 | |
| Zippered bag. Hey, I never showed them how to set a zipper...they figured it out themselves! |
This project was done on mostly donations. I got a lot of the fabric and notions as donations from parents and the community. Teachers and parents and students lent their sewing machines. Of all the sewing machines we had one worked the best an old 1960's Singer. Amazing, right? All the others kept breaking down and were too sensitive for use.
Now with that said, I plan to do this next year but get another teacher to help me and we may break it up to more crafting and will include sewing, knitting, embroidery, jewelry making it but the premise will be thrift it then make it.
Cheers.
Sunday, January 1, 2012
Happy New Year

We advanced to an eatery and had a nosh. While we sat in the sun - yes we were wrapped up against the chill but the sun warmed us - a monarch landed in the bush next to us. He/she wondered below the canopy of the leaves and the then boldly emerged to stand for its photo op. What a beautiful reminder of how precious life is and how strong even a simple creature like this butterfly is. This butterfly is probably one of the early arrivals of flocks of migrating Monarchs braving through ancestoral memory the migration from southern climates to come north and start life again. Many do not make it but those that do remind us how strong we can be in life's journey to survive and thrive.
Best wishes in 2012 to you all. May your days be filled with creativity, love, hope and joy. No matter what the world (media, politicians and other unhappy souls) say or do, don't let anyone steal your joy and share it that joy. Happy New Year!
Subscribe to:
Comments (Atom)